Motors
Run Motor for Duration

This block will run one or more motors clockwise or counterclockwise for a specified number of rotations, seconds, or degrees.
The motor speed is set by the Set Speed Block. The default speed is 75%.
BW
A run clockwise for 1 rotations
Python
await motor.run_for_degrees(
    port.A, int(1 * 360), abs(motor_speed(port.A, 1)),
    acceleration=2000 if device.id(port.A) == 65 else 4000,
    deceleration=2000 if device.id(port.A) == 65 else 4000,
)
HubOS API explanation
motor.run_for_degrees(port: int, degrees: int, velocity: int, *, stop: int = BRAKE, acceleration: int = 1000, deceleration: int = 1000) -> Awaitable
Turn a motor for a specified number of degrees. Positive degrees turn clockwise; negative degrees turn counterclockwise.
port: The hub port connected to the motor.
degrees: The number of motor degrees to turn.
velocity: Motor speed in degrees per second.
stop: Behavior after the movement; defaults to brake.
acceleration: Starting acceleration; HubOS defaults to 1000 degrees per second squared.
deceleration: Ending deceleration; HubOS defaults to 1000 degrees per second squared.
device.id(port: int) -> int
Get the device type ID of a device connected to a port.
port: A hub port. The converter checks for ID 65 to use the Small Motor acceleration default.
Defaults and differences
The image shows port A running clockwise for one rotation. The converter turns one rotation into 360 motor degrees. motor_speed() uses the saved Set Motor Speed percentage, or Word Blocks' 75% default when no speed has been set. The generated acceleration and deceleration values preserve Word Blocks' motor-type defaults rather than HubOS's own defaults.
Gotchas
motor_speed() is a bundled conversion helper that turns a Word Blocks percentage into degrees per second. The long Python call is the converter's equivalent of this one block; the helper and imports are supplied elsewhere in the generated program. await belongs inside an async function.
Start Motor

This block will run one or more motors clockwise or counterclockwise forever. The motor speed is set by the Set Speed Block. The default speed is 75%.
BW
A start motor clockwise
Python
motor.run(
    port.A, motor_speed(port.A, 1),
    acceleration=2000 if device.id(port.A) == 65 else 4000,
)
HubOS API explanation
motor.run(port: int, velocity: int, *, acceleration: int = 1000) -> None
Run a motor at a constant speed until a new command is given.
port: The hub port connected to the motor.
velocity: Motor speed in degrees per second; its sign determines direction.
acceleration: Starting acceleration in degrees per second squared. HubOS defaults to 1000.
device.id(port: int) -> int
Get the device type ID of a device connected to a port.
port: A hub port. The converter checks for ID 65 to use the Small Motor acceleration default.
Defaults and differences
The image shows motor A starting clockwise. motor_speed() uses the saved speed or the 75% Word Blocks default. The converter supplies motor-type acceleration explicitly; omitting it would use HubOS's different default.
Gotchas
This starts the motor and returns immediately. The motor keeps running until another command changes or stops it. motor_speed() is a bundled conversion helper; the generated program supplies its definition.
Stop Motor

This block stops one or more motors from running. The motor will brake so that it quickly comes to a complete stop.
BW
A stop motor
Python
motor.stop(port.A)
HubOS API explanation
motor.stop(port: int, *, stop: int = BRAKE) -> None
Stop a motor. The default stop behavior is brake.
port: The hub port connected to the motor.
stop: Behavior after stopping; defaults to brake.
Defaults and differences
The image shows motor A stopping. Word Blocks brakes the motor. HubOS's motor.stop() also defaults to brake, so the generated call does not need an explicit stop=motor.BRAKE argument.
Gotchas
This stops the selected motor only. A motor-pair movement uses the separate Stop Moving block and a motor_pair call.
Set Motor Speed

This block sets the speed of one or more motors. The speed range is -100 to 100. Negative values will reverse the direction of the motor. If the speed hasn't been specified, the default value is 75%.
BW
A set speed to 75 %
Python
motor_speeds[port.A] = 75
Defaults and differences
Word Blocks uses 75% when no Set Motor Speed block has run. The generated Python keeps that default in its bundled motor_speed() helper. This assignment changes the saved speed; it does not start the motor.
Gotchas
motor_speeds is initialized in the generated program's helper section. A later motor command turns this percentage into a HubOS speed for the motor on port A.
Movement
Move for Duration
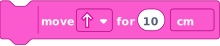
This block moves a Driving Base either forward or backward for a specified number of centimeters, inches, seconds, degrees, or rotations. The distance that's moved in centimeters and inches depends on how the Driving Base has been built. Use the *Set 1 Motor Rotation to Distance Moved* Block to calibrate your Driving Base.
BW
move forward for 10 cm
Python
await motor_pair.move_for_degrees(movement_pair(), distance_degrees(10, 'cm'), 0, velocity=percent_speed(movement_speed), acceleration=1800, deceleration=1800)
HubOS API explanation
motor_pair.move_for_degrees(pair: int, degrees: int, steering: int, *, velocity: int = 360, stop: int = motor.BRAKE, acceleration: int = 1000, deceleration: int = 1000) -> Awaitable
Move a motor pair for a specified number of motor degrees. Await it before running the next command.
pair: The paired motor slot, supplied by the converter's movement_pair() helper.
degrees: The number of motor degrees to move.
steering: Steering from -100 to 100; 0 goes straight.
velocity: Motor speed in degrees per second.
stop: Behavior after the movement; defaults to brake.
acceleration: Starting acceleration in degrees per second squared; HubOS defaults to 1000.
deceleration: Ending deceleration in degrees per second squared; HubOS defaults to 1000.
Defaults and differences
The image shows a forward move of 10 cm. Word Blocks starts with A+B as the movement motors and 50% movement speed. The bundled movement_pair(), distance_degrees(), and percent_speed() helpers preserve those settings. The explicit acceleration and deceleration values preserve Word Blocks' 1800 defaults; HubOS has different defaults.
Gotchas
The distance is calculated from the saved distance per motor rotation. Set 1 Motor Rotation to Distance Moved changes that calibration. This command waits for the move to finish before the next command runs, so it uses await inside an async function. Without the exported # @lego block ID comment, importing this Python call may rebuild the equivalent Move with Steering block set to straight: 0.
Start Moving
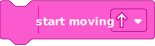
This block starts moving a Driving Base either forward or backward.
BW
start moving forward
Python
motor_pair.move(movement_pair(), 0, velocity=percent_speed(movement_speed), acceleration=1800)
HubOS API explanation
motor_pair.move(pair: int, steering: int, *, velocity: int = 360, acceleration: int = 1000) -> None
Move a motor pair at a constant speed until another command changes or stops it.
pair: The paired motor slot, supplied by the converter's movement_pair() helper.
steering: Steering from -100 to 100; 0 goes straight.
velocity: Motor speed in degrees per second.
acceleration: Starting acceleration in degrees per second squared. HubOS defaults to 1000.
Defaults and differences
The image shows forward movement. Steering 0 means straight. Word Blocks starts with A+B as the movement motors and 50% movement speed. The explicit 1800 acceleration preserves the Word Blocks default rather than HubOS's default.
Gotchas
This command starts the motors and returns immediately. They keep moving until another movement command changes or stops them. The generated program supplies the movement_pair() and percent_speed() helpers. Without the exported # @lego block ID comment, importing this Python call may rebuild the equivalent Start Moving with Steering block set to straight: 0.
Move with Steering for Duration

This block moves a Driving Base forward for a certain duration with the possibility of steering. Higher steering values (i.e., +99 and -99) will make the arc path of the Driving Base sharper. Use a value of “0” to drive in a straight line. Using the values 100 and -100 will make the Driving Base pivot on itself.
BW
move right: 30 for 10 rotations
Python
await motor_pair.move_for_degrees(movement_pair(), int(10 * 360), 30, velocity=percent_speed(movement_speed), acceleration=1800, deceleration=1800)
HubOS API explanation
motor_pair.move_for_degrees(pair: int, degrees: int, steering: int, *, velocity: int = 360, stop: int = motor.BRAKE, acceleration: int = 1000, deceleration: int = 1000) -> Awaitable
Move a motor pair for a specified number of motor degrees. Await it before running the next command.
pair: The paired motor slot, supplied by the converter's movement_pair() helper.
degrees: The number of motor degrees to move.
steering: Steering from -100 to 100; 0 goes straight.
velocity: Motor speed in degrees per second.
stop: Behavior after the movement; defaults to brake.
acceleration: Starting acceleration in degrees per second squared; HubOS defaults to 1000.
deceleration: Ending deceleration in degrees per second squared; HubOS defaults to 1000.
Defaults and differences
The image shows right: 30 steering for 10 motor rotations. One rotation becomes 360 motor degrees, so the Python call requests 3600 degrees. Word Blocks starts with A+B as the movement motors and 50% movement speed. The 1800 acceleration and deceleration values preserve Word Blocks' defaults.
Gotchas
Positive steering turns right in the Word Blocks convention used by the converter; negative steering turns left. This block waits for its movement to finish, so the Python call uses await inside an async function.
Start Moving with Steering
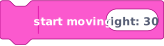
This block starts moving a Driving Base forward with the possibility of steering forever. Higher steering values (i.e., +99 and -99) will make the arc path of the Driving Base sharper. Use a value of “0” to drive in a straight line. Using the values 100 and -100 will make the Driving Base pivot on itself.
BW
start moving right: 30
Python
motor_pair.move(movement_pair(), 30, velocity=percent_speed(movement_speed), acceleration=1800)
HubOS API explanation
motor_pair.move(pair: int, steering: int, *, velocity: int = 360, acceleration: int = 1000) -> None
Move a motor pair at a constant speed until another command changes or stops it.
pair: The paired motor slot, supplied by the converter's movement_pair() helper.
steering: Steering from -100 to 100; 0 goes straight.
velocity: Motor speed in degrees per second.
acceleration: Starting acceleration in degrees per second squared. HubOS defaults to 1000.
Defaults and differences
The image shows right: 30 steering. Word Blocks starts with A+B as the movement motors and 50% movement speed. The explicit 1800 acceleration preserves the Word Blocks default.
Gotchas
This command returns immediately and keeps the pair moving until another command changes or stops it. Steering 0 goes straight, while 100 and -100 turn in place.
Stop Moving
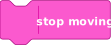
This block stops all movement of a Driving Base by braking the motors.
BW
stop moving
Python
motor_pair.stop(movement_pair())
HubOS API explanation
motor_pair.stop(pair: int, *, stop: int = motor.BRAKE) -> None
Stop a motor pair. The default stop behavior is brake.
pair: The paired motor slot to stop.
stop: Behavior after stopping; defaults to brake.
Defaults and differences
The image shows Stop Moving, which brakes the movement motors. HubOS motor_pair.stop() also defaults to brake, so the generated call does not need an explicit stop argument.
Gotchas
This stops the currently selected movement pair. movement_pair() pairs A+B the first time it is needed if no Set Movement Motors block has run.
Set Movement Speed
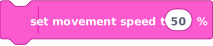
This block sets the speed of a moving Driving Base. The speed range is -100 to 100. Negative values change the direction of the movement. The default value is 50%.
BW
set movement speed to 50 %
Python
global movement_speed
movement_speed = 50
Defaults and differences
Word Blocks uses 50% when no Set Movement Speed block has run. The generated Python starts with movement_speed = 50 for the same reason. Inside a function, global movement_speed makes the assignment update that program-wide setting. This assignment changes the speed used by later movement commands; it does not move the robot.
Gotchas
Generated movement calls convert the saved percentage with percent_speed() before passing a velocity to HubOS. Keep the helper when editing an exported program. The global declaration appears once near the top of a function, even if it sets movement speed more than once.
Set Movement Motors
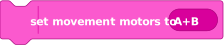
This block defines the Ports to which the 2 driving motors are connected.
BW
set movement motors to A+B
Python
set_motor_pair(port.A, port.B)
Defaults and differences
The image selects ports A+B. Word Blocks uses A+B by default, so this particular selection restates that default. The bundled set_motor_pair() helper unpairs the previous selection if needed and pairs the selected ports in HubOS.
Gotchas
Select two motors of the same type for synchronized movement. This command chooses the pair for later movement commands; it does not move the robot.
Set 1 Motor Rotation to Distance Moved

This block calibrates the distance of a Driving Base so that the distance unit (i.e., centimeters/inches) specified in the Movement Blocks will be accurate.
BW
set 1 motor rotation to 17.5 cm moved
Python
global rotation_cm
rotation_cm = 17.5
Defaults and differences
The image says one motor rotation moves the robot 17.5 cm. rotation_cm stores that calibration for later distance_degrees() calls. The generated program starts with a wheel-based value for this setting until a calibration block changes it.
Gotchas
The global rotation_cm line belongs inside the same function as the assignment. It makes later movement commands use the new distance calibration. This block does not move the robot.
Light
Write on 5x5 Light Matrix

This block displays a text string on the 5x5 light matrix by scrolling one letter at a time over the display.
BW
write "Hello"
Python
await light_matrix.write(str('Hello'))
HubOS API explanation
light_matrix.write(text: str, intensity: int = 100, time_per_character: int = 500) -> Awaitable
Display text one character at a time on the hub's 5×5 light matrix.
text: The text to display.
intensity: Pixel brightness; defaults to 100.
time_per_character: Milliseconds per character; defaults to 500.
Defaults and differences
The picture writes Hello on the hub's 5×5 light matrix. HubOS scrolls the text one character at a time. The converter uses str() so the same call also works when a Word Blocks value is a number.
Gotchas
The Python call waits until the writing finishes, so it needs await inside an async function. This block uses the hub's built-in matrix, not a Color Matrix connected to a port.
Turn On 3x3 Color Matrix for Seconds

This block creates a pattern and makes it light up on the 3x3 color matrix for a specified length of time. The Block will turn the pixels off when the time is up.
BW
A turn on pixels "777777777" for 2 seconds
Python
color_matrix.show(port.A, matrix_pixels('777777777'))
await runloop.sleep_ms(int(2 * 1000))
color_matrix.clear(port.A)
HubOS API explanation
color_matrix.show(port: int, pixels: list[tuple[int, int]]) -> None
Set the colors and intensities of all nine Color Matrix pixels at once.
port: The hub port connected to the Color Matrix.
pixels: Nine color-and-intensity pairs, supplied here by matrix_pixels().
runloop.sleep_ms(duration: int) -> Awaitable
Pause the execution of the application for any amount of milliseconds.
duration: The duration in milliseconds.
color_matrix.clear(port: int) -> None
Turn off every pixel on the Color Matrix connected to a port.
port: The hub port connected to the Color Matrix.
Defaults and differences
The pictured 3×3 pattern has nine pixels encoded as 7, the HubOS color code for yellow, and stays on for 2 seconds. matrix_pixels() is a bundled helper that turns each digit into a color-and-brightness pair. The exported Python shows the pattern, waits, then turns it off.
Gotchas
Keep these three Python lines together when editing the block: the wait and clear make this a timed display. The pictured device is on port A; choose the port where the Color Matrix is connected on your robot.
Set Pixel Brightness on 3x3 Color Matrix

This block sets the color and brightness of an individual pixel on the 3x3 color matrix. Only the specified pixel is updated. The rest of the color matrix remains unchanged.
BW
A set pixel at 1, 1 to red at 100 %
Python
color_matrix.set_pixel(port.A, 1 - 1, 1 - 1, (color.RED, 100))
HubOS API explanation
color_matrix.set_pixel(port: int, x: int, y: int, pixel: tuple[int, int]) -> None
Set one Color Matrix pixel to a color and intensity.
port: The hub port connected to the Color Matrix.
x: The zero-based pixel column, from 0 to 2.
y: The zero-based pixel row, from 0 to 2.
pixel: A color constant and brightness percentage from 0 to 100.
Defaults and differences
The picture sets pixel 1, 1 on the Color Matrix at port A to red with 100% brightness. Word Blocks counts pixel positions from 1, while HubOS counts from 0, so the converter subtracts 1 from both coordinates.
Gotchas
This changes only one pixel and returns immediately. The other eight pixels keep their current colors. Choose the actual connected Color Matrix port for your robot.
Set Center Button Light

This block sets the color of the Center Button light.
BW
set Power Button light to red
Python
light.color(light.POWER, color.RED)
HubOS API explanation
light.color(light: int, color: int) -> None
Set the color of a light on the hub.
light: The hub light to change; this example uses light.POWER.
color: A color constant such as color.RED.
Defaults and differences
The catalog calls this “Set Center Button Light,” while the pictured Word Block says “Power Button light.” Both examples set that hub light to red.
Gotchas
This changes the hub button light, not the 5×5 light matrix or a Color Matrix attached to a port.
Events
When Program Starts

This block plays all of the blocks attached to it, sequentially from top to bottom, when the program starts.
BW
WHEN program starts:
Python
# When program starts
async def when_program_starts():
    pass
Defaults and differences
Both forms start this script when the program starts. pass keeps the pictured empty stack valid Python; replace it with commands when adding blocks below the hat.
Gotchas
Each additional start hat gets a numbered function name, such as when_program_starts_2(). The generated program calls these coroutines from runloop.run(...) so they can run concurrently.
When Color Is

This block plays all of the blocks attached to it when the Color Sensor detects a specified color. The detectable colors are:
- (0) Black
- (1) Violet
- (3) Blue
- (4) Light Blue
- (6) Green
- (7) Yellow
- (9) Red
- (10) White
- (-1) no color
This block will only trigger when it detects the specified color. This means that the block won't re-trigger if the detected color remains unchanged.
BW
WHEN A color is red:
Python
# Runnable Python conversion for this event is not implemented yet.
Defaults and differences
The image selects port A and red. In Word Blocks, this event fires when the sensor changes to red; it does not keep firing while the color stays red. The .bw converter can preserve and rebuild this event, but the Python exporter does not yet implement its trigger and cancellation behavior.
Gotchas
A simple if color_sensor.color(port.A) == color.RED inside when_program_starts() would check only once, so it would not mean the same thing. Do not replace this event with that code when round-tripping a project.
When I Receive Message
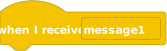
This block plays all of the blocks attached to it when a specified message is broadcasted by the *Broadcast Message* Block or the *Broadcast Message and Wait* Block.
BW
WHEN I receive "message1":
Python
# When I receive 'message1'
async def when_message1():
    pass
Defaults and differences
The image listens for message1. pass represents the pictured empty stack. An exported program supplies the message dispatcher that calls this function after a matching broadcast.
Gotchas
Several hats can listen for the same message. They receive numbered Python function names, such as when_message1_2(), and the generated dispatcher invokes each listener. Keep the generated dispatcher when editing exported Python.
Broadcast Message

This block broadcasts a specified message. All of the *When I Receive Message* Hat Blocks that have been set to the specified message will play. After the message has been sent, the next block in the programming stack will play.
BW
broadcast "message1"
Python
broadcast('message1')
Defaults and differences
Both forms send message1 to matching receivers and then continue with the next command. broadcast() is a bundled conversion helper because HubOS does not provide Word Blocks message broadcasts directly.
Gotchas
This block does not wait for receivers to finish. The exported program's message dispatcher and runloop.run(...) calls are needed for receiver functions to execute.
Control
Wait for Seconds

This block pauses the programming stack for a specified number of seconds — it supports whole numbers and decimals.
BW
wait 1 seconds
Python
await runloop.sleep_ms(1000)
HubOS API explanation
runloop.sleep_ms(duration: int) -> Awaitable
Pause the execution of the application for any amount of milliseconds.
duration: The duration in milliseconds.
Defaults and differences
Both examples use the 1 second shown in the block image. This is an example input, not a program-wide wait setting. HubOS takes milliseconds, so the converter multiplies a literal number of seconds by 1000.
Gotchas
await belongs inside an async function. For a calculated duration, the exported Python uses int((seconds) * 1000) rather than a fixed 1000. After a Python round trip, .bw may display this duration as 1.0 seconds; it is still one second.
Repeat loop
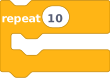
All of the blocks held inside this block will loop a specified number of times before allowing the programming stack to continue.
BW
REPEAT 10:
  wait 1 seconds
Python
for repeat_index in range(10):
    await runloop.sleep_ms(1000)
    await runloop.sleep_ms(10)  # Give other scripts a turn.
HubOS API explanation
runloop.sleep_ms(duration: int) -> Awaitable
Pause the execution of the application for any amount of milliseconds.
duration: The duration in milliseconds.
Defaults and differences
The image shows a count of 10. The one-second wait fills the pictured empty body to make a complete example. Python's range(10) runs the body ten times. The converter adds a short pause after each repetition so other scripts can run.
Gotchas
The pause is part of the exported loop behavior; keep it when editing the Python. The commands in the body must be indented. The generated code uses repeat_index even when the loop number is not used by the body.
Forever Loop
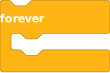
All of the blocks held inside this block will loop forever.
The only way to stop the loop is to interrupt the program by pressing the Stop Button, or by using the Stop All Block.
BW
FOREVER:
  wait 1 seconds
Python
while True:
    await runloop.sleep_ms(1000)
    await runloop.sleep_ms(10)  # Give other scripts a turn.
HubOS API explanation
runloop.sleep_ms(duration: int) -> Awaitable
Pause the execution of the application for any amount of milliseconds.
duration: The duration in milliseconds.
Defaults and differences
The one-second wait fills the pictured empty loop body. while True keeps repeating until the program is stopped. The converter adds a short pause after each pass so other scripts can run.
Gotchas
Statements after this loop in the same script are unreachable unless the loop is interrupted. Keep an await in a forever loop so it does not monopolize the run loop.
If Then
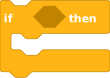
This block will check whether the specified boolean condition is true.
If the condition is true, all of the blocks held inside it will play. If the condition is false, the blocks will be ignored.
BW
IF E is color red? THEN:
  wait 1 seconds
Python
if (color_sensor.color(port.E) == color.RED):
    await runloop.sleep_ms(1000)
HubOS API explanation
color_sensor.color(port: int) -> int
Read the color currently detected by a Color Sensor.
port: The hub port connected to the Color Sensor.
runloop.sleep_ms(duration: int) -> Awaitable
Pause the execution of the application for any amount of milliseconds.
duration: The duration in milliseconds.
Defaults and differences
The image has an empty condition and body. This example checks whether the sensor on port E sees red, then waits one second. In both forms, the body runs only when the condition is true.
Gotchas
The condition must produce True or False. An empty condition can be shown in .bw, but it cannot produce runnable Python until a condition is supplied.
If Then Else
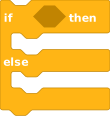
This block will check whether the specified boolean condition is true.
If the condition is true, the blocks held inside the first space will play and the stack will continue. If the condition is false, the blocks inside the second space will play.
BW
IF E is color red? THEN:
  wait 1 seconds
ELSE:
  wait 2 seconds
Python
if (color_sensor.color(port.E) == color.RED):
    await runloop.sleep_ms(1000)
else:
    await runloop.sleep_ms(2000)
HubOS API explanation
color_sensor.color(port: int) -> int
Read the color currently detected by a Color Sensor.
port: The hub port connected to the Color Sensor.
runloop.sleep_ms(duration: int) -> Awaitable
Pause the execution of the application for any amount of milliseconds.
duration: The duration in milliseconds.
Defaults and differences
The pictured condition and both branches are empty. This example checks whether the sensor on port E sees red and waits a different time in each branch. Exactly one branch runs: the first when the condition is true, the else branch otherwise.
Gotchas
The else line aligns with if, and each branch body is indented. Fill the condition before exporting runnable Python.
Wait Until

This block pauses the programming stack until the specified boolean condition is true.
BW
wait until E is color red?
Python
await runloop.until(lambda: color_sensor.color(port.E) == color.RED)
HubOS API explanation
runloop.until(function: Callable[[], bool], timeout: int = 0) -> Awaitable
Pause the script until the supplied function returns true.
function: A function called repeatedly to check the condition; the generated code uses lambda.
timeout: Optional timeout in milliseconds; 0 means wait without a timeout.
color_sensor.color(port: int) -> int
Read the color currently detected by a Color Sensor.
port: The hub port connected to the Color Sensor.
Defaults and differences
The image shows an empty condition. This example waits until the sensor on port E sees red. runloop.until() checks the sensor again while the script waits.
Gotchas
The lambda: lets HubOS reread the sensor rather than using a value calculated only once. An empty condition cannot produce runnable Python until it is filled.
Repeat Until Loop
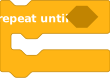
All of the blocks held inside this block will loop until the specified boolean condition is true. When the specified condition becomes true, blocks beneath it will play.
BW
REPEAT UNTIL E is color red?:
  wait 1 seconds
Python
while not ((color_sensor.color(port.E) == color.RED)):
    await runloop.sleep_ms(1000)
    await runloop.sleep_ms(10)  # Give other scripts a turn.
HubOS API explanation
color_sensor.color(port: int) -> int
Read the color currently detected by a Color Sensor.
port: The hub port connected to the Color Sensor.
runloop.sleep_ms(duration: int) -> Awaitable
Pause the execution of the application for any amount of milliseconds.
duration: The duration in milliseconds.
Defaults and differences
The image has an empty condition and body. This example waits for the sensor on port E to see red and uses a one-second wait as the body. The converter adds a short pause after each pass.
Gotchas
while not is the Python counterpart of “repeat until.” The body runs while the sensor does not see red; once it sees red, the loop ends.
Sensors
Is color?

This block returns “true” when the Color Sensor detects the specified color. The detectable colors are:
- (0) Black
- (1) Violet
- (3) Blue
- (4) Light Blue
- (6) Green
- (7) Yellow
- (9) Red
- (10) White
- (-1) No color
BW
A is color red?
Python
color_sensor.color(port.A) == color.RED
HubOS API explanation
color_sensor.color(port: int) -> int
Read the color currently detected by a Color Sensor.
port: The hub port connected to the Color Sensor.
Defaults and differences
The image checks whether the Color Sensor on port A sees red. Both forms produce a true-or-false value that can fill an IF, wait until, or similar condition.
Gotchas
This is a condition, not a command by itself. On the team's robot, the Color Sensors are on ports E and F, so change A and port.A to the connected sensor port when using this example.
Color

This block returns the current value of the color detected by the Color Sensor. The detectable colors are:
- (0) Black
- (1) Violet
- (3) Blue
- (4) Light Blue
- (6) Green
- (7) Yellow
- (9) Red
- (10) White
- (-1) No color
BW
A color
Python
color_sensor.color(port.A)
HubOS API explanation
color_sensor.color(port: int) -> int
Read the color currently detected by a Color Sensor.
port: The hub port connected to the Color Sensor.
Defaults and differences
The image reads the Color Sensor on port A. Both forms return the currently detected color code; they do not wait for a particular color.
Gotchas
This is a value to use inside another block or Python expression. On the team's robot, the Color Sensors are on E and F, so select the actual connected port.
Is reflected light?

This block returns “true” when the light reflected back to the Color Sensor is greater than, equal to, or less than the specified percentage.
BW
A reflection < 50 %?
Python
color_sensor.reflection(port.A) < 50
HubOS API explanation
color_sensor.reflection(port: int) -> int
Read the reflected-light level measured by a Color Sensor as a percentage.
port: The hub port connected to the Color Sensor.
Defaults and differences
The image asks whether reflected light on port A is below 50%. Both forms compare a current sensor reading with the pictured threshold and return true or false.
Gotchas
Reflection varies with sensor height, lighting, and the surface. Measure values on your robot before choosing a threshold. The team's Color Sensors are on E and F rather than the pictured port A.
Hub Pitch Roll Yaw Angle

This block reports the Hub's pitch, roll, or yaw angle. *Pitch*, *roll*, and *yaw* are terms commonly used to describe an airplane's movement through air but they can apply to any object rotating in all three dimensions. When looking at an airplane:
- The *pitch angle* refers to the airplane's nose going up or down.
- The *roll angle* refers to the airplane's wings going up or down.
- The *yaw angle* refers to the direction of the airplane compared to the ground.
BW
pitch angle
Python
motion_sensor.tilt_angles()[1] / 10
HubOS API explanation
motion_sensor.tilt_angles() -> tuple[int, int, int]
Read yaw, pitch, and roll angles in tenths of a degree.
Defaults and differences
The image selects pitch. HubOS reports tilt angles in tenths of a degree, so the converter divides by 10 to match the degree value shown in Word Blocks. Index 1 selects pitch.
Gotchas
This is a value expression. The same block can select roll or yaw. Yaw uses an additional sign change in the converter because its Word Blocks direction differs from HubOS's measured sign convention.
Set Hub Yaw Angle to 0

This block sets the yaw angle of the Hub to “0.” By default, the yaw angle will be “0” in the direction in which the Hub is facing when the program starts.
BW
set yaw angle to 0
Python
motion_sensor.reset_yaw(0)
HubOS API explanation
motion_sensor.reset_yaw(angle: int) -> None
Set the current yaw angle to the specified value.
angle: The new yaw value; the Word Blocks command sets it to zero.
Defaults and differences
Both forms make the hub's current facing direction the new zero for yaw. The picture shows the only value this block sets: zero.
Gotchas
Later yaw readings are relative to this new zero. Resetting yaw in the middle of a program changes the reference for any heading calculation that follows.
Timer

This block reports the time, in seconds, since the program started. The timer restarts every time the program restarts. Use the Reset Timer Block to manually restart the timer.
BW
timer
Python
timer_seconds()
Defaults and differences
Both forms report seconds elapsed since the program started or the last Reset Timer block. timer_seconds() is a bundled conversion helper built from MicroPython's millisecond clock.
Gotchas
This is a value expression, not a delay. Keep the bundled timer helper and its _timer_start state when editing an exported program.
Reset Timer

This block resets the timer.
BW
reset timer
Python
reset_timer()
Defaults and differences
Both forms restart the timer at zero. reset_timer() is a bundled helper that updates the starting millisecond count used by later Timer readings.
Gotchas
Reset Timer does not pause the script. To wait, use a Wait for Seconds or Wait Until block.
Operators
Plus

This block adds two values and returns the result.
BW
2 + 3
Python
2 + 3
Defaults and differences
The picture has two empty number slots; 2 and 3 make a complete example. Both forms add the values.
Gotchas
Use this expression inside a command such as Set Variable To.
Minus

This block subtracts the second value from the first value and returns the result.
BW
5 - 2
Python
5 - 2
Defaults and differences
The picture has two empty number slots; 5 and 2 make a complete example. The second value is subtracted from the first.
Gotchas
Changing the order changes the answer.
Multiply

This block multiplies two values and returns the result.
BW
2 * 3
Python
2 * 3
Defaults and differences
The picture has two empty number slots; 2 and 3 make a complete example. Both forms multiply the values.
Gotchas
Use parentheses around a larger expression when the intended order is unclear.
Divide

This block divides the second value by the first value and returns the result.
BW
6 / 2
Python
6 / 2
Defaults and differences
The picture has two empty number slots; 6 and 2 make a complete example. Both forms divide the first value by the second.
Gotchas
Do not use zero as the divisor.
Less Than

This block checks whether the first value is less than the second value. If it's less, it'll return “true.” If not, it'll return “false.”
BW
50 < "100"
Python
50 < 100
Defaults and differences
The picture has an empty left socket and 100 on the right; this example puts 50 on the left. The converter uses a numeric Python comparison.
Gotchas
The Word Blocks comparison socket may display numeric text. Preserve exported # @lego comments when editing an existing block; importing an unannotated Python comparison can rebuild numeric-looking values as text sockets.
Equal

This block checks whether the first value is equal to the second value. If it's equal, it'll return “true.” If not, it'll return “false.”
BW
50 = "100"
Python
50 == 100
Defaults and differences
The picture has an empty left socket and 100 on the right; this example puts 50 on the left. Python spells equality with == rather than =.
Gotchas
In Python, a single = assigns a value. Use == in a condition. Unannotated imports may display numeric-looking values as text in the rebuilt comparison block.
Greater Than

This block checks whether the first value is greater than the second value. If it's greater, it'll return “true.” If not, it'll return “false.”
BW
150 > "100"
Python
150 > 100
Defaults and differences
The picture has an empty left socket and 100 on the right; this example puts 150 on the left. Both forms test whether the first value is greater.
Gotchas
Unannotated imports may display numeric-looking values as text in the rebuilt comparison block; keep # @lego comments for exact block identity.
And

This block joins two Boolean Blocks with an “AND” condition.
BW
(A is color red?) and (A reflection < 50 %?)
Python
(color_sensor.color(port.A) == color.RED) and (color_sensor.reflection(port.A) < 50)
HubOS API explanation
color_sensor.color(port: int) -> int
Read the color currently detected by a Color Sensor.
port: The hub port connected to the Color Sensor.
color_sensor.reflection(port: int) -> int
Read the reflected-light level measured by a Color Sensor as a percentage.
port: The hub port connected to the Color Sensor.
Defaults and differences
The pictured condition sockets are empty. This example fills them with two Color Sensor checks. The result is true only when both checks are true.
Gotchas
Python checks the right-hand condition only when the left-hand condition is true. The pictured port A is not where this team has its Color Sensors; use E or F on this robot.
Or

This block joins two Boolean Blocks with an “OR” condition.
BW
(A is color red?) or (A reflection < 50 %?)
Python
(color_sensor.color(port.A) == color.RED) or (color_sensor.reflection(port.A) < 50)
HubOS API explanation
color_sensor.color(port: int) -> int
Read the color currently detected by a Color Sensor.
port: The hub port connected to the Color Sensor.
color_sensor.reflection(port: int) -> int
Read the reflected-light level measured by a Color Sensor as a percentage.
port: The hub port connected to the Color Sensor.
Defaults and differences
The pictured condition sockets are empty. This example fills them with two Color Sensor checks. The result is true when either check is true.
Gotchas
Python skips the right-hand check when the left-hand condition is already true. Use the connected sensor port on your robot.
Not

This block inverts the boolean value of the condition inside it.
BW
not (A is color red?)
Python
not (color_sensor.color(port.A) == color.RED)
HubOS API explanation
color_sensor.color(port: int) -> int
Read the color currently detected by a Color Sensor.
port: The hub port connected to the Color Sensor.
Defaults and differences
The pictured condition socket is empty. This example makes the condition true when the Color Sensor is not seeing red.
Gotchas
not reverses a true-or-false result; it does not change the sensor reading itself.
Is Between

This block checks whether the first value specified falls between the second and third specified values, including both endpoints.
BW
is 0 in between -10 and 10?
Python
-10 <= 0 <= 10
Defaults and differences
The image asks whether 0 lies from -10 through 10. Both endpoints count, so Python uses two <= comparisons.
Gotchas
Replace 0 with a changing value to make this condition useful, such as a sensor reading or variable.
Join Strings

This block joins two text values and returns the result (e.g., if “hello” and “world” were input into the block, it would return “helloworld”).
BW
join "apple" "banana"
Python
join_text('apple', 'banana')
Defaults and differences
The image joins apple and banana in that order, producing applebanana. join_text() is a bundled helper that converts both inputs to text before joining them.
Gotchas
There is no separator unless you include one in an input, such as a space at the end of the first string.
Letter of String

This block returns the character that occupies the specified position of the given string. As an example, "letter 1 of LEGO" will return "L."
BW
letter 1 of "apple"
Python
letter_at(1, 'apple')
Defaults and differences
The image asks for letter 1 of apple, which is a. letter_at() is a bundled helper because Word Blocks counts from 1, while Python string indexes count from 0.
Gotchas
The helper returns an empty string when the position is outside the text.
Mod

This block returns the remainder when the first value is divided by the second value (e.g., when *10* is the first input and *3* is the second, the block will report *1*; *10* divided by *3* gives a remainder of *1*). Negative numbers behave a little differently because a remainder must always be positive (e.g., *-10* mod *3* equals *2*, not *-1* because you have to multiply *3* by *-4* to have any remainder at all).
BW
10 mod 3
Python
10 % 3
Defaults and differences
The pictured sockets are empty; 10 and 3 make a complete example. Both forms return the remainder, which is 1.
Gotchas
The second value must not be zero. Python uses % where Word Blocks writes mod.
Round

This block rounds the given number to the nearest integer. It follows the standard rules of rounding (i.e., decimals of .5 or higher are rounded up, whereas decimals of less than .5 are rounded down).
BW
round 2.5
Python
round_number(2.5)
Defaults and differences
The pictured socket is empty; 2.5 makes a complete example. round_number() is a bundled helper that rounds a positive half upward, like the Word Blocks block.
Gotchas
Python’s built-in round() uses ties-to-even, so round(2.5) would be 2 rather than the pictured block’s 3.
Math Functions

This block performs the specified math function on a given number and reports the result.
BW
abs of -5
Python
abs(-5)
Defaults and differences
The image selects abs; this example fills its empty number socket with -5. Both forms return 5, the value without its sign.
Gotchas
The same Word Blocks menu offers other math functions. This entry documents the pictured abs selection; check the converter before using a different selection.
Variables
Set Variable To

This block sets the specified variable to the given value. The variable can be either a string or a number.
BW
set V to 0
Python
global v
v = 0
Defaults and differences
The picture sets variable V to 0. A complete .bw program declares it with VARIABLE "V" = 0; exported Python creates v = 0 before the functions. The global line makes an assignment inside a function update that program-wide variable.
Gotchas
Declare global v once at the beginning of any function that assigns to v. Python converts the Word Blocks name to a valid identifier; keep the exported name when editing for round trips. Keep its exported # @lego comment for exact value-socket identity; without it, an imported numeric-looking value may become a quoted text socket.
Change Variable By

This block changes the specified variable by a given value. The change is from the specified amount from the value currently stored in the variable. For example, if my variable contains the value *4*, using the Change Variable By 3 Block would make the value change to *7*. Also, if the variable is a text string (not a number), the value of the variable is set to the quantity the variable was to be changed by. For example, if “my variable” contains “LEGO,” using the block shown above will change the value to “1.”
BW
change V by 1
Python
global v
v += 1
Defaults and differences
The picture adds 1 to V. Python's += means “add to the current value and store the result.” As with Set Variable To, the exported program declares the variable before the functions.
Gotchas
Declare global v once at the start of a function that changes v; combine it with other globals on one line in exported Python. Word Blocks also permits changing a text value, but this simple Python form assumes v is a number.
Define Block

This block allows you to create your own block. A *My Block* is the group of blocks that’s attached to the Define Block.
BW
DEFINE B:
Python
async def b():
    pass
Defaults and differences
The picture defines a My Block named B with an empty body. pass makes that empty definition valid Python. Add indented commands below the definition to give the block behavior.
Gotchas
The exported function is async because commands inside it may wait for motors or time. The converter makes the block name a Python identifier; here B becomes b.
My Block

This is your block! It'll play whatever you've attached to the Define Block.
BW
B
Python
await b()
Defaults and differences
The picture calls My Block B. Python calls the corresponding async def b() function. Both run the commands in that definition before continuing.
Gotchas
This call belongs inside an async function, and the B definition must be present in the same program. My Blocks with inputs gain Python function parameters and call arguments.
More Motors
Go to Relative Motor Position at Speed

This block runs one or more motors to a relative position at a specified speed. Unlike the absolute position that's used in the *Go to Position* Block, the relative position has no range limit and can be preset with the <i>Set Relative Motor Position to 0<i/> Block.
BW
A go to relative position 0 at 100 % speed
Python
await motor.run_to_relative_position(port.A, 0, percent_speed(100, port.A), acceleration=2000 if device.id(port.A) == 65 else 4000, deceleration=2000 if device.id(port.A) == 65 else 4000)
HubOS API explanation
motor.run_to_relative_position(port: int, position: int, velocity: int, *, stop: int = BRAKE, acceleration: int = 1000, deceleration: int = 1000) -> Awaitable
Turn a motor to a specified position relative to its current reference.
port: The hub port connected to the motor.
position: The target relative position in motor degrees.
velocity: The motor speed in degrees per second.
stop: Behavior at the end; HubOS defaults to brake.
acceleration: Starting acceleration in degrees per second squared.
deceleration: Ending deceleration in degrees per second squared.
device.id(port: int) -> int
Get the device type ID of a device connected to a port.
port: A hub port. The converter checks for ID 65 to use the Small Motor acceleration default.
Defaults and differences
The picture selects motor A, relative position 0, and 100% speed. percent_speed() converts the saved percentage to HubOS degrees per second. The explicit acceleration values preserve Word Blocks' motor-type defaults rather than HubOS's 1000 default.
Gotchas
Position 0 is the pictured value; a motor already at its relative zero will not travel. This call waits for the movement to finish, so it needs await inside an async function. In a project that changes motor stop or acceleration settings, the exported call also reads that saved state.
Set Relative Motor Position to 0

This block sets the relative position of one or more motors to a specified value. Use a value of \"0\" to reset the relative position.
BW
A set relative position to 0
Python
motor.reset_relative_position(port.A, 0)
HubOS API explanation
motor.reset_relative_position(port: int, position: int) -> None
Set the reference position used by relative-position reads and moves.
port: The hub port connected to the motor.
position: The new relative-position value; the pictured block uses zero.
Defaults and differences
The picture resets motor A's relative position to zero. Both forms change the position reference used by later relative-position readings and moves; the motor does not turn.
Gotchas
Resetting the reference in the middle of a program changes what a later Go to Relative Motor Position block targets.
Relative Motor Position

This block returns the number of degrees that the specified motor has turned since the program started or was reset by the *Set Relative Motor Position to 0* Block.
BW
A relative position
Python
motor.relative_position(port.A)
HubOS API explanation
motor.relative_position(port: int) -> int
Read a motor's signed position in degrees relative to its current reference.
port: The hub port connected to the motor.
Defaults and differences
The picture reads motor A's position in degrees relative to its current reference. Both forms return a signed number.
Gotchas
This is a value to use inside another block or Python expression. Set Relative Motor Position to 0 changes the reference for later readings.
Stop and Coast Motors

This block specifies how the motor will stop when using a Motor Block with a specified duration, or the Stop Motor Block. The motor can stop in three different ways:
- *Brake*: the default method in which the motor uses power to brake when stopping and applies friction to the motor afterward
- *Hold position*: the motor uses power to brake and actively moves the motor back to the position in which it stopped, if it is forced away from it
- *Coast*: the power to the motor is cut when stopping
BW
A set motors to brake at stop
Python
motor_stops[port.A] = motor.BRAKE
Defaults and differences
The picture selects brake for motor A. Brake is already the Word Blocks and HubOS default. The exported program stores this selection in motor_stops so later motor commands can read it.
Gotchas
This command does not stop a running motor by itself. The LEGO menu also offers hold and coast, but the current converter has verified only the pictured brake encoding for Python round trips.
Set Motor Acceleration

This block sets the acceleration and deceleration of one or more motors. The acceleration can be set to fast, medium or slow. The default acceleration is medium.
A customs acceleration can be set by inputting a variable with two numbers separated by a space. The first number sets the acceleration, the second number sets the deceleration. The range is 1-10000 with higher numbers giving a faster acceleration. The default values are: - Fast =10000 - Medium = 2000 for the Small Motor, 4000 for the Medium and Larger Motor - Slow = 1000
BW
A set acceleration to medium
Python
motor_acceleration[port.A] = (4000, 4000)
Defaults and differences
The picture selects medium acceleration for motor A. The tuple gives starting acceleration and ending deceleration in degrees per second squared. Later exported motor calls use this saved setting.
Gotchas
The reference lists medium as 4000 for Medium and Large Motors, but 2000 for a Small Motor. This pictured medium selector exports 4000; port A on the team's robot has a Medium Motor. Recheck this setting if using a Small Motor.
More Movement
Start Moving at Speed

This block starts moving a Driving Base forever at the speed that's been specified for each motor. The first specified speed value sets the speed of the left motor, and the second specified value sets the speed of the right motor.
BW
start moving at 50 left 50 right % speed
Python
motor_pair.move_tank(movement_pair(), percent_speed(50, _pair_ports[0]), percent_speed(50, _pair_ports[1]), acceleration=1800)
HubOS API explanation
motor_pair.move_tank(pair: int, left_velocity: int, right_velocity: int, *, acceleration: int = 1000) -> None
Run the left and right motors at independent speeds until another command changes or stops them.
pair: The paired motor slot, supplied by movement_pair().
left_velocity: Left motor speed in degrees per second.
right_velocity: Right motor speed in degrees per second.
acceleration: Starting acceleration in degrees per second squared; HubOS defaults to 1000.
Defaults and differences
The picture shows 50% for each motor. percent_speed() converts each percentage to HubOS degrees per second for its selected motor. The exported call supplies Word Blocks' initial 1800 movement acceleration instead of HubOS's 1000 default.
Gotchas
This starts both motors and returns immediately; another movement command must change or stop them. If the program uses Set Movement Acceleration, the exported call reads that saved setting instead of a fixed 1800.
Set Movement Motors to Brake at Stop

This block specifies how motors will stop when using a Movement Block with a specified duration, or the Stop Moving Block. The motor can stop in three different ways:
- *Brake*: the default method in which the motor uses power to brake when stopping and applies friction to the motor afterward
- *Hold position*: the motor uses power to brake and actively moves the motor back to the position in which it stopped, if it is forced away from it
- *Coast*: the power to the motor is cut when stopping
BW
set movement motors to brake at stop
Python
global movement_stop
movement_stop = motor.BRAKE
Defaults and differences
The picture selects brake, which is already the Word Blocks and HubOS default. The assignment records the choice for later movement stops and moves with a duration.
Gotchas
This command does not stop motors immediately. Put global movement_stop at the start of the containing function, combining it with other global names when needed. The LEGO menu also offers hold and coast, but the converter has verified only the pictured brake encoding.
Set Movement Acceleration

This block sets the acceleration and deceleration of a Driving Base. The acceleration can be set to fast, medium or slow. The default acceleration is medium. A customs acceleration can be set by inputting a variable with two numbers separated by a space. The first number sets the acceleration, the second number sets the deceleration. The range is 1-10000 with higher numbers giving a faster acceleration. The default values are: Fast =10000 Medium = 1800 Slow = 1000
BW
set movement acceleration to medium
Python
global movement_acceleration
movement_acceleration = (4000, 4000)
Defaults and differences
The pictured medium dropdown is encoded as 4000 for both acceleration and deceleration, so the converter stores (4000, 4000). Later exported movement calls read this pair. The generated program starts with (1800, 1800) before this block runs.
Gotchas
LEGO's help text calls 1800 the medium movement default, while the pictured dropdown's XML stores 4000. The guide shows the encoded value used by the converter; the actual SPIKE behavior of this discrepancy needs robot verification. Put global movement_acceleration at the start of the containing function.